4Runner/Hilux Solid Axle Swap (SAS)
Posted: Thu Jun 12, 2008 5:07 pm
Hilux solid axle swap - done two years ago. :D
Eventually… Well, after 4 idler arms and as many tie rod ends, as well as zero front flex I decided to take the plunge and do the famed SAS (solid axle swap). I have been dreaming about this conversion for the last 5 years but never had the guts – read cash – to actually attempt it. Well as they say: I should have done it looong ago!
Some people will ask why I didn’t just import the complete SAS kit from AllPro or Marlin Crawler, but what would I have learnt if I just bolted on everything. Although a lot of information is available on the Net and I had accumulated lots of articles in old magazines on this subject, most of the items had to be carefully measured and manufactured.
My vehicle is actually a 1992 4Runner 2.8D left hand drive, but the IFS Hilux is the same except for the wheelbase.
I had the OME IFS suspension for 4 years – excellent – and decided to re-use the rear leaf springs and shocks, as they were still in excellent nick.
My first advice to anybody attempting this: do your homework before the time! This proved to be the best thing I could have done as I only had one snag which was easily remedied, but more on that later.
I decided to convert the steering to crossover steering at the same time, this moves the tie rod above the springs and out of harms way, as well as eliminate the - prone to breaking – horseshoe steering arm and torque rod. The standard IFS steering box is retained.
The standard solid axle steering can still be used, although you would need the steering box from the sa Hilux, as the IFS box is different.
Here is a step by step account of the conversion as I can remember.
The list of items needed was as follows:
- Hilux solid axle complete – swapped for old IFS parts
- Front spring hangers complete – used original Hilux hangers, made gussets
- Front extended shackles complete – made up plates & used original pins
- Front leaf spring packs – OME heavy duty diesel packs + bush kits
- Tubes through chassis for shackle hangers & jigs for cutting holes – had them turned, jigs from Marlin Crawler
- U-bolt reversal front & rear – made plates, bought U-Bolts
- Bump stops – original Hilux
- Extended front shock towers – made them
- Rubicon 14†travel monotube shocks
- Land Cruiser pitman arm and 4 x tie rod ends
- 32mm OD x 16mm ID tie rod and drag link – had them tapped and flats machined
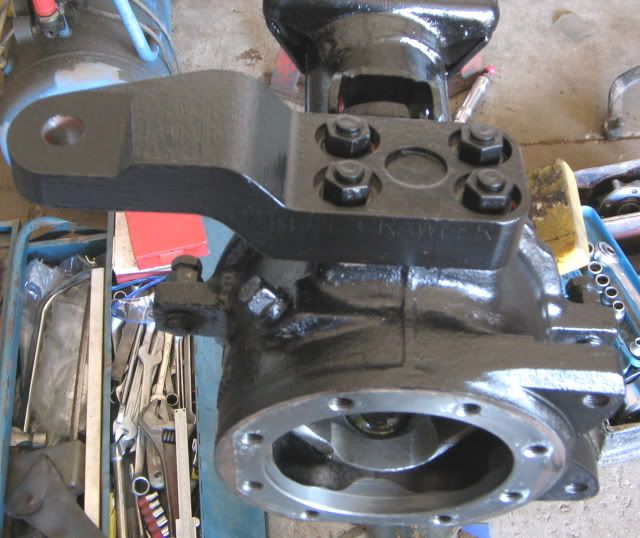
- Marlin Crawler Billet Crossover steering arms
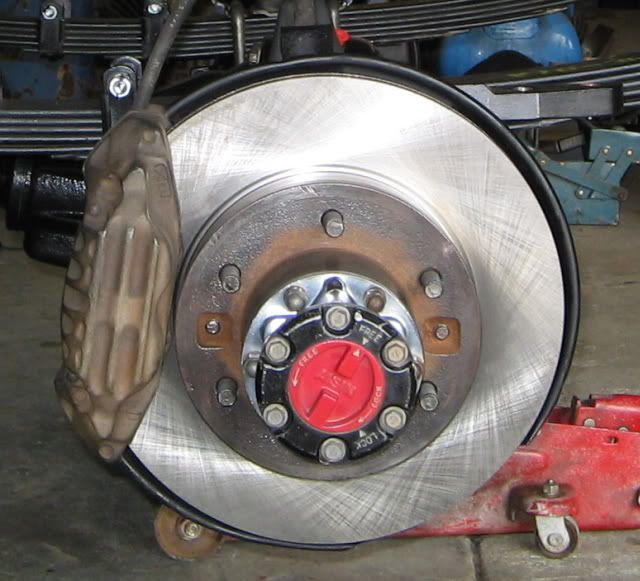
- Land Cruiser vented brake discs – allows re-use of IFS 4-pot callipers for better braking, solid axle has solid discs and smaller callipers.
- 40mm front wheel spacers – had made – needed to clear IFS callipers and to get track width same as rear axle.
- Extended brake lines front & rear – had them made
- Steering damper – used old OME IFS damper & made brackets
- Extended front prop shaft – used IFS front yoke with old Hilux rear CV – the IFS front yoke can twist 40º where the old Hilux only 20º, while the CV knuckle of the old Hilux can swivel a lot more than the IFS CV. Also lengthened by 2â€
- Solid axle knuckle service kit & king pin bearings – overhaul front axle
- Rear leaf spring packs – used old OME springs
- Rear shocks – used old OME shocks
- Rear cross member to mount shocks inwards – made them
- Rear extended shackles – made them
- Rear handbrake lever extensions – made them
- Exhaust modification
- Cutting & grinding discs, welding rods, primer, chassis satin black paint, hole saw
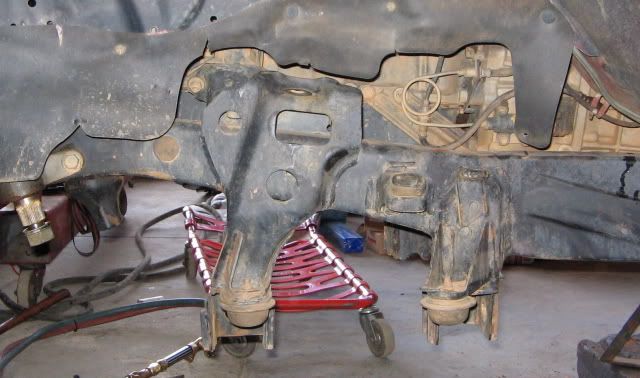
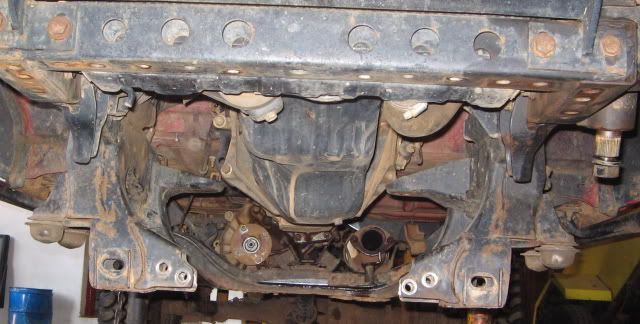
Once everything was in my hands it was time to take the plunge and remove all the IFS brackets with a cutting torch, hint – wear proper protective clothing! I still have scars! Great care was taken not to nick the frame and weaken it; this was followed by grinding everything smooth. The engine mounts were boxed again with some 6mm plate.
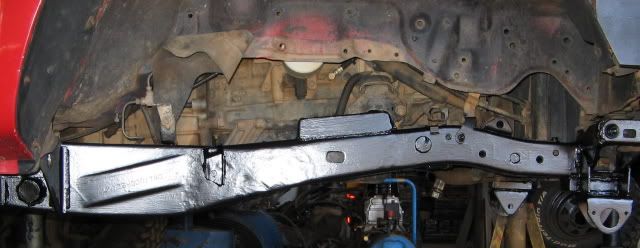

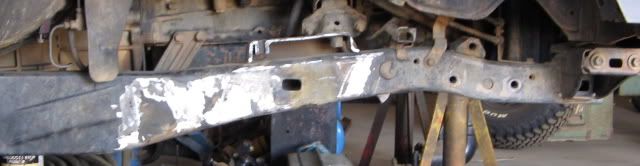
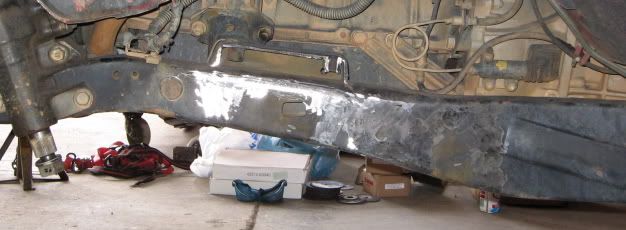
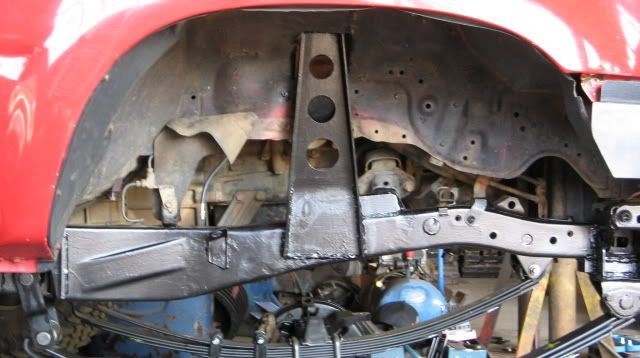
Spacers were made and welded to the front of the chassis to space the front hangers down, this is essential to ensure enough bump stop clearance as the IFS chassis is much flatter than the solid axle chassis. Then it was time to cut the old front spring hangers from a piece of chassis and make them look new again, I could have made new ones from scratch…
The spring mounts were held the exact distance apart by tack welding a tube between them and then positioning the assembly on the front of the chassis and tack it in position.
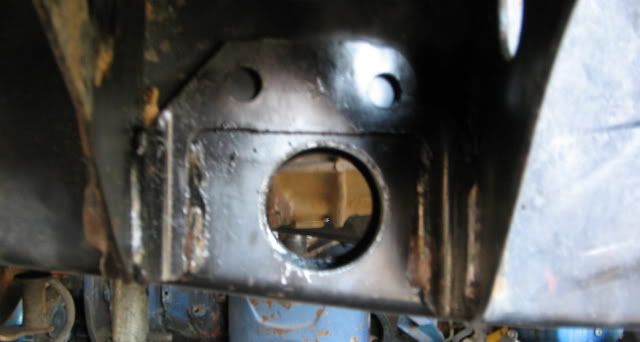
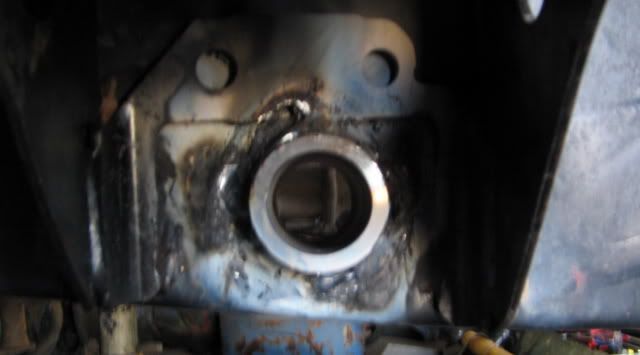
Next the chassis jigs were positioned in the centre of the body mount as shown and marked for drilling the holes for the shackle tubes. We spent an entire Saturday morning measuring and re-measuring for correct placement. This was essential as the vehicle is a daily driver and the caster angle and shackle angle had to be perfect to ensure drivability and safety. The holes were drilled with a hole saw and the chassis tubes measured and tack welded in place. Now the OME springs could be hung and the shackle angle checked before final welding. Everything looked OK and the final welds were burned in. The gussets for the front hangers were made and welded in.

I decided on the OME springs for three reasons: ride quality, flex & durability. No other spring, in my humble opinion, can come close to the OME for pure strength and a comfy ride. They can flex like no tomorrow and still retain their camber for many years. Other springs on the market are much cheaper, but the results explain why.
I used the bare shell of the front axle to mock up and test everything as it was very light compared to the fully assembled front axle. I used the old u-bolts to fit the bare axle to the springs and jacked the front up on its own weight to check bump stop clearance, which was OK.
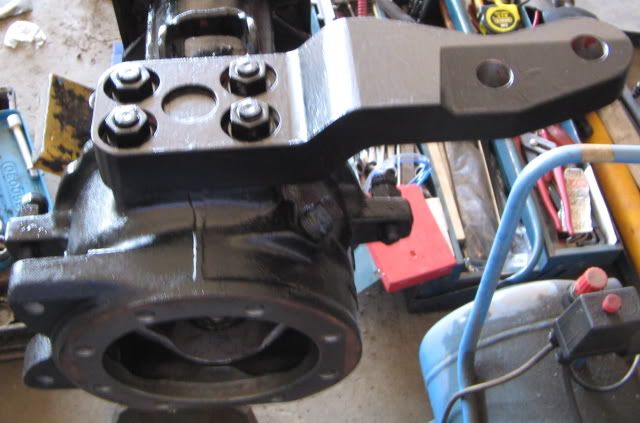
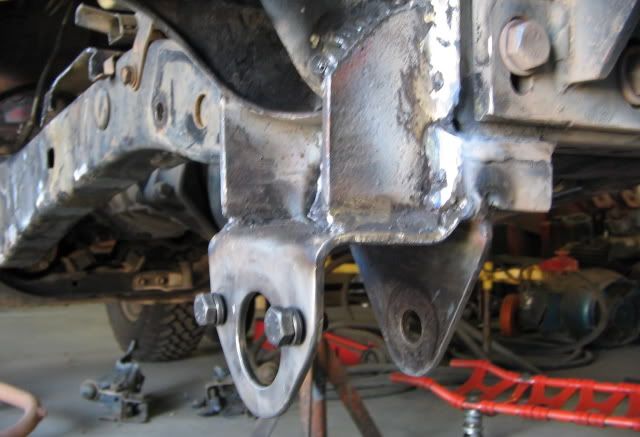
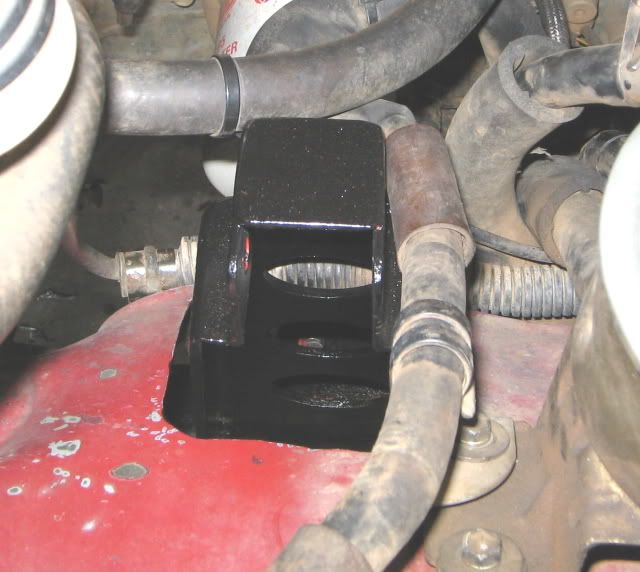
Next the axle was fully rebuilt; new kingpin bearings, seals etc. were fitted. The mount for the torque rod was cut off as the rod will not be used with crossover steering. This also helps with articulation, as there is no more binding which restricts travel. The spring perches were heated up to a dull red and straightened with a hammer & punch to be perfectly level. Gussets were made and welded in to strengthen the perches. This is a very important step, as the perches are all bowed, which leads to the leaf springs being bent when tightened down with the u-bolts, placing unnecessary strain on the springs. The Marlin Crawler steering arms were fitted – these are works of art! – And the new vented discs and IFS callipers were fitted. I decided to import these arms as I didn’t want to weld some arms together and compromise on safety. I was blessed as the axle was in excellent condition – it came from a 1988 Hilux! – seemed as if it was never used off-road as the ring & pinion, birfields and free wheel hubs were brand new! I filled the knuckles and wheel bearings with some new grease and she was good as new. A push lock fitting was fitted to the breather hole, and the pipe routed high up in the engine bay.
I had to change the final drive ratios as well, as the diesel Hiluxes had a 4.56 ratio and the petrol ones 4.88 ratio, which suited me, as the 2.8 diesel is not exactly very fast and the 4.88 would restore some power, although not enough to run 33 inch tyres though! I managed to swap the 4.56 rear centre portion for a rebuilt 4.88 unit at a wrecking yard for free! They needed the 4.56 centre portion as these are quite scarce and had many 4.88 units as all the older petrol Hiluxes had these ratios fitted. I moved the rear auto locker – 4 years old – to the front axle and fitted a new unit to the rear, as the rear axle works most of the time.
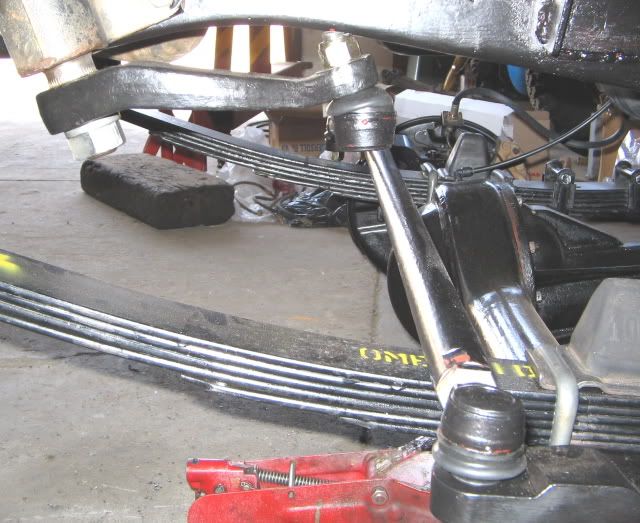
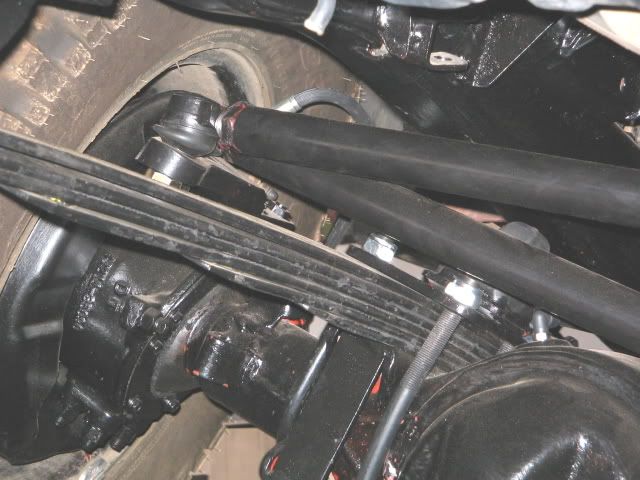
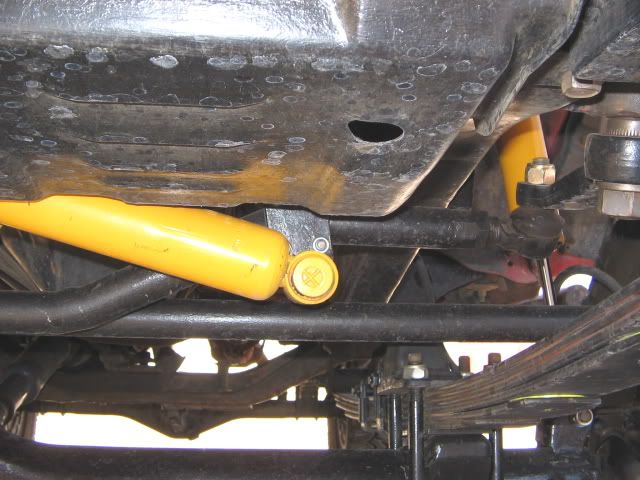
Now the pitman arm was fitted and the heavy duty tie rod and draglink lengths were measured. I had an engineering shop machine them to length and tap them left and right hand thread. I could have done this, but it was much easier to do on the lathe as the thread had to be 70mm deep. They also machined some flats on the rods to help fit a 30mm spanner. The rods were fitted to the steering arms with Land Cruiser tie rod ends, these have a 23mm thread where the Hilux units are 21mm, and the tapers are the same. All this ensured a bullet-proof steering system.
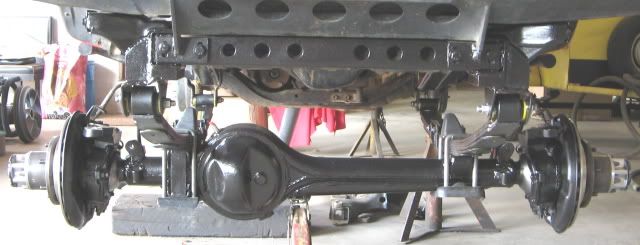
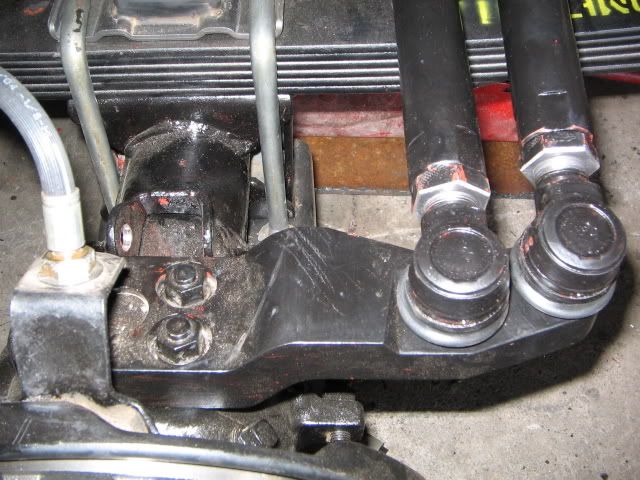
The bump stops were modified and welded to the new u-bolt plates I made and the u-bolts were fitted and torqued to 125Nm. The left side u-bolts are square at the bottom and the right side is round. The u-bolt next to the pumpkin has to be shaped and is longer than the others.
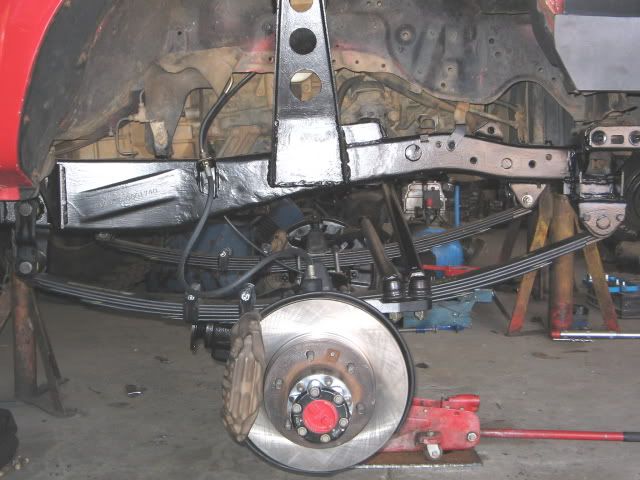
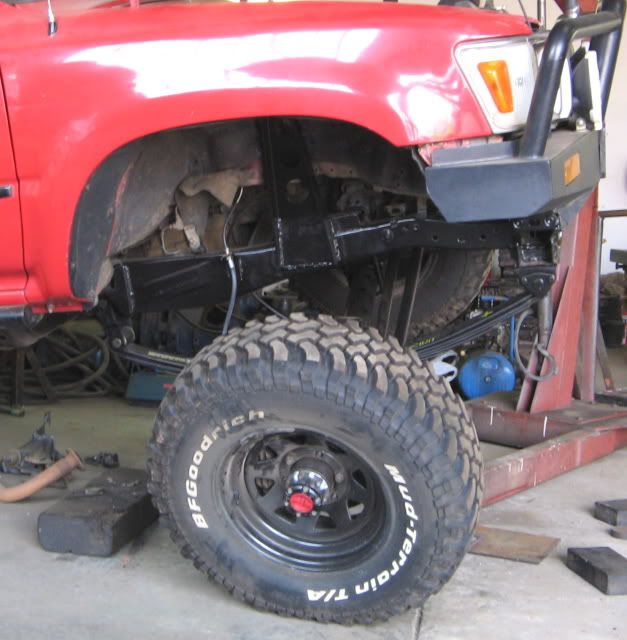
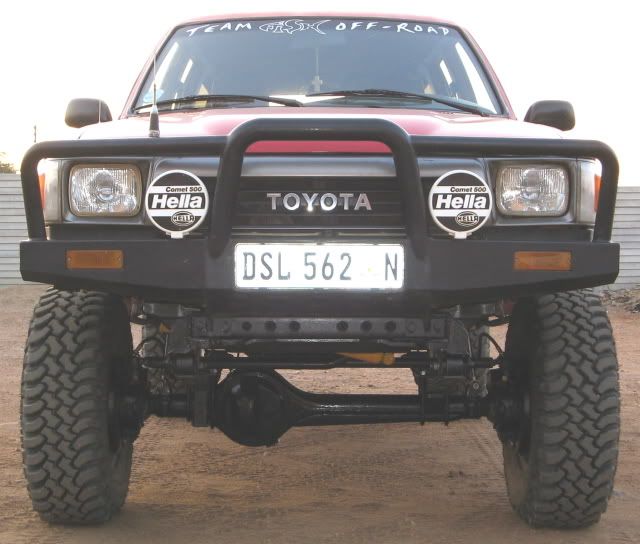
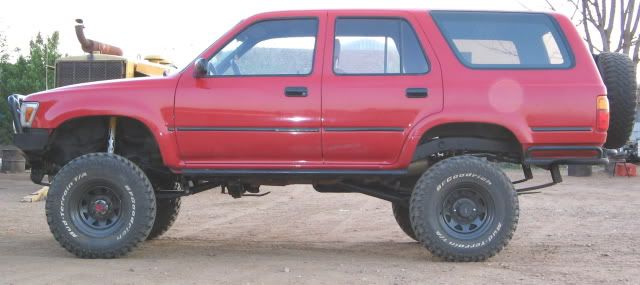
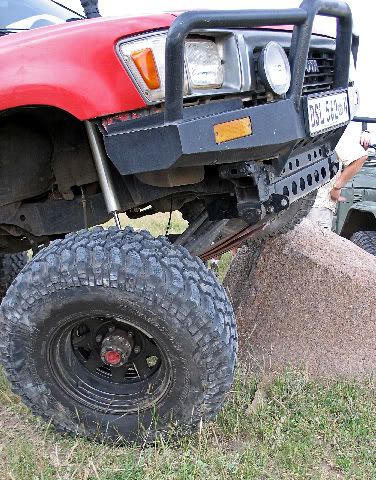
Next the wheel spacers and extended brake lines were fitted and the 31†BF Muds could be slapped on. At this stage 31s will have to do, as the 2.8D will not power the 33†donuts I would like to fit!

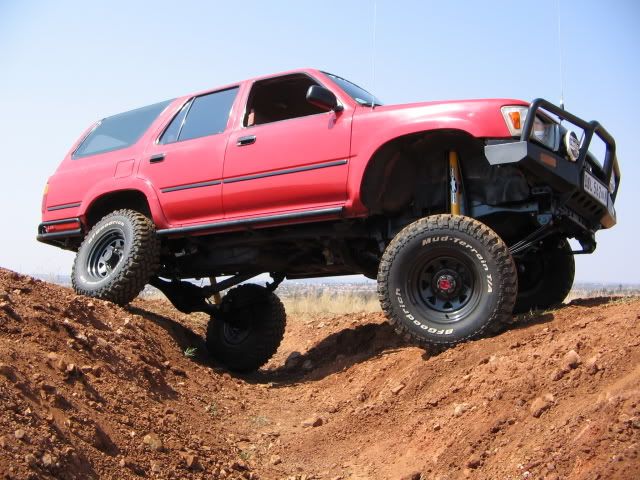
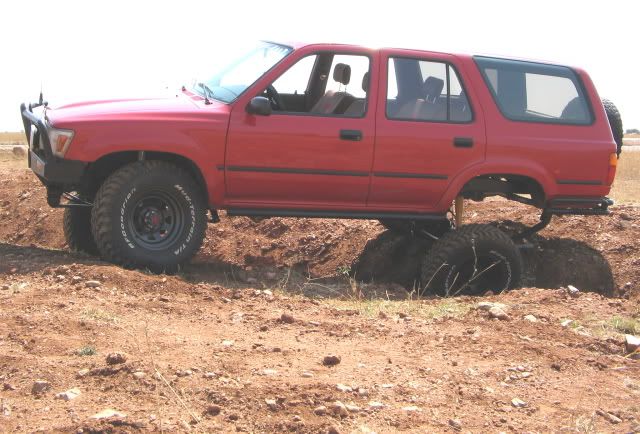
I mocked up the flex using a workshop crane and checked the steering clearance and bump stop gap as well as measured for shock placement. Everything looked great and the flex was amazing. Don’t be fooled though, real world flex is totally different and this became evident later when I flexed my baby through a serious ditch.
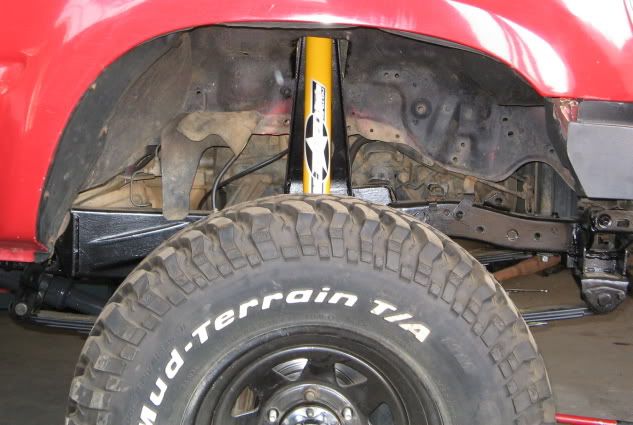
Shock mounts were made from scratch and holes cut through the inner fenders to stick them through. Once the correct measurements were taken, they were welded on and they look great!
Next the prop shaft was modified as mentioned above and fitted.


Now attention could be turned to the rear suspension and as the front was ± 70mm higher than the rear, I had a hard time deciding what to do. The correct thing to do was to get new spring packs with 5†lift (OME 50mm + new 70mm), but the budget was stretched already and the old OME springs were still fine. The other reason was that the flatter OME springs flex much better than springs with a heavy arch. I decided to fit 2 overload leafs, cut to the length of the spring perch, under the springs for a 25mm lift and the rest was made up with longer shackles. Not the ideal setup, but fitting a 70mm block under the leaf springs was a no-no as the axle wrap was already a problem with the long springs. (IFS Hilux rear springs are 200mm longer than the old Hilux springs). I could have cut of the front spring hanger and spaced it down, but this would hang too low down and be snagged by every rock in sight.
To retain the handbrake, the levers on the back of the drums had to be extended as well as the bracket on the diff. The handbrake cable was moved down and tied to the fuel tank guard with the original clip.
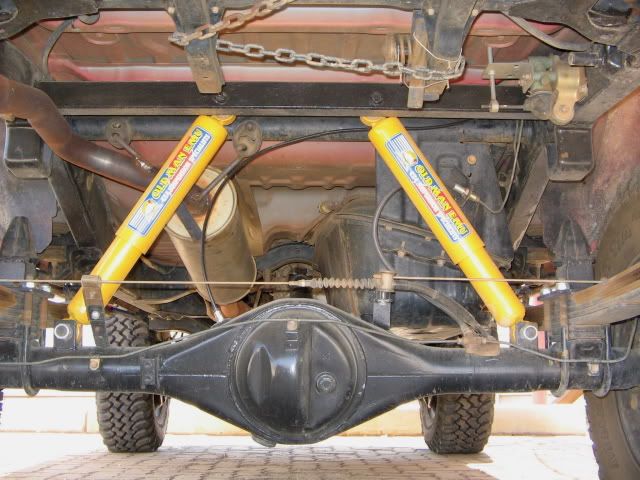
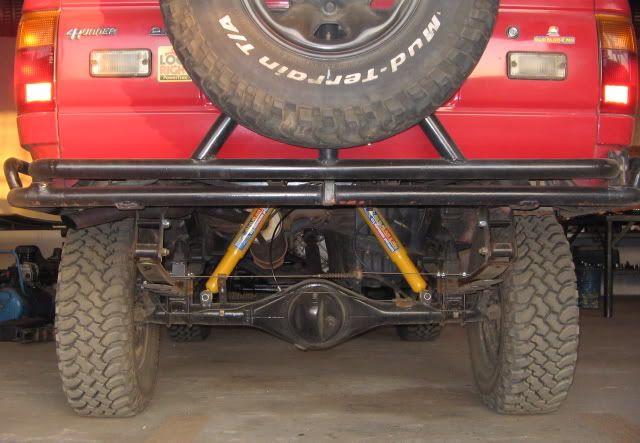
To mount the shocks inward at the rear, I had to make a new cross member. I used heavy wall square tubing and used the pins of the old spring plates to attach the top of the shock. The bottom mounts were made and welded to the top of the diff as close to the spring perch as possible. The axle was fitted with only the main leafs from each spring pack, to allow full compression, this way I could see exactly where the cross member had to be mounted. This is essential as the axle moves around an arc and not straight up and down.
Next I decided to re-paint the shocks with the OME yellow and it made the world of difference. Shocks were mounted front & rear and all bolts & nuts were checked for tightness.
Then on to some real world testing, I drove through quite a ditch and proceeded to rest the full weight of the vehicle on the draglink on the right side, not to mention stuffing the tyres into the back of the fender well. This is where I was glad to have over killed on the steering, as the draglink was still fine!
Back to the workshop where the draglink was removed and after careful measurement a - z – was bent into the left side of the link. I must not let it sound too easy as we actually heated the link till it was red hot and still had to use a length of pipe to get it to bend! This solved the problem completely and the draglink no longer hit the chassis, nor the sump. The back of the fender was customized with a BFH (big friggin hammer) to clear the tyres. At a later stage when I fit 33s, I’ll cut out the foot wells and weld some new plate in for clearance. I could have mounted the axle forward 1â€, but then the steering would not have been as easy to fit; the steering box would need to be moved forward.
The IFS exhaust is routed under the front prop shaft and has to be modified, had it routed to go just underneath the gearbox, just behind the bell housing and out to the back. At the rear it had to be snaked around the left shock. All came out very good.
Lastly the OME steering damper was fitted with a custom bracket and small u-bolts.
Feedback after a month of driving and wheeling:
- I was ready for the notorious hard ride of the solid axle, but in all honesty, the ride comfort is equal to, if not better than the IFS! No joke! The body roll is a lot more, but this is still a controlled roll where the body will roll when negotiating a corner at speed, but doesn’t feel wallowy at all. This can be remedied by fitting an anti-roll bar with quick disconnects for wheeling. I’m already used to the body roll, in any case it is fun to scare little old ladies when you go around a corner and it looks as if you are going to fall on them! Only joking!
- There is a bit of feedback through the steering wheel when on uneven tar roads, but this is due to the wheel spacers which alters the turning angle of the knuckles.
- The steering effort is the same as with the IFS steering, which is an added bonus.
- Braking is powerful as with the IFS.
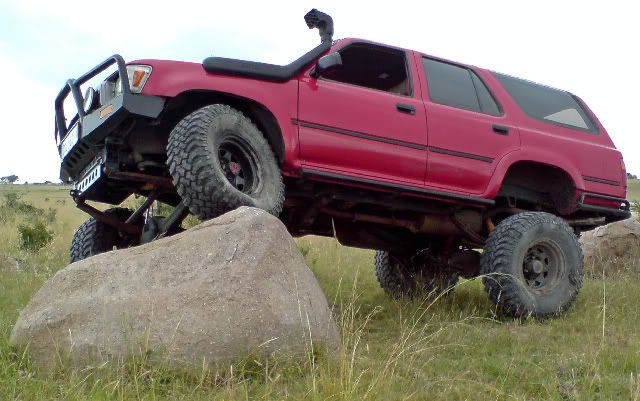
- Off-road the suspension is just awesome. Actually you don’t appreciate it until you let somebody else drive and you can see the suspension at work. It is very hard to lift a tyre and most hills and rocks can just be crawled at idle speed.
- The big problem now is clearance, under the diffs, fuel tank etc. Previously with the IFS, the vehicle would run out of traction long before you get hung up on an obstacle. Now, it just wants to go forward and anything in the way will just be, well, in the way. Rock rash is a very real concern!
- As I said before, I should have done this a long time ago and with the nice smooth ride, what a pleasure!
UPDATE:
- The Rubicon shocks fitted to the front turned out to be too softly valved for the 4Runner. I bought some 14†Fox Racing shocks, re-valved them and fitted remote reservoirs – awesome! Have been running these for the past two years now.
- Had some issues with the tie rod hitting the sump on full compression after airborne antics – ended up re-drilling the front spring perches and moving the axle forward 1 inch. This worked out very well and gave some extra clearance for fitting 33’s.
- Massaged the inner fender well with a 14 lbs hammer to clear 33’s.
- Recently fitted 1KZTE engine with original computer etc. See other posting for details.

Eventually… Well, after 4 idler arms and as many tie rod ends, as well as zero front flex I decided to take the plunge and do the famed SAS (solid axle swap). I have been dreaming about this conversion for the last 5 years but never had the guts – read cash – to actually attempt it. Well as they say: I should have done it looong ago!
Some people will ask why I didn’t just import the complete SAS kit from AllPro or Marlin Crawler, but what would I have learnt if I just bolted on everything. Although a lot of information is available on the Net and I had accumulated lots of articles in old magazines on this subject, most of the items had to be carefully measured and manufactured.
My vehicle is actually a 1992 4Runner 2.8D left hand drive, but the IFS Hilux is the same except for the wheelbase.
I had the OME IFS suspension for 4 years – excellent – and decided to re-use the rear leaf springs and shocks, as they were still in excellent nick.
My first advice to anybody attempting this: do your homework before the time! This proved to be the best thing I could have done as I only had one snag which was easily remedied, but more on that later.
I decided to convert the steering to crossover steering at the same time, this moves the tie rod above the springs and out of harms way, as well as eliminate the - prone to breaking – horseshoe steering arm and torque rod. The standard IFS steering box is retained.
The standard solid axle steering can still be used, although you would need the steering box from the sa Hilux, as the IFS box is different.
Here is a step by step account of the conversion as I can remember.
The list of items needed was as follows:
- Hilux solid axle complete – swapped for old IFS parts
- Front spring hangers complete – used original Hilux hangers, made gussets
- Front extended shackles complete – made up plates & used original pins
- Front leaf spring packs – OME heavy duty diesel packs + bush kits
- Tubes through chassis for shackle hangers & jigs for cutting holes – had them turned, jigs from Marlin Crawler
- U-bolt reversal front & rear – made plates, bought U-Bolts
- Bump stops – original Hilux
- Extended front shock towers – made them
- Rubicon 14†travel monotube shocks
- Land Cruiser pitman arm and 4 x tie rod ends
- 32mm OD x 16mm ID tie rod and drag link – had them tapped and flats machined
- Marlin Crawler Billet Crossover steering arms
- Land Cruiser vented brake discs – allows re-use of IFS 4-pot callipers for better braking, solid axle has solid discs and smaller callipers.
- 40mm front wheel spacers – had made – needed to clear IFS callipers and to get track width same as rear axle.
- Extended brake lines front & rear – had them made
- Steering damper – used old OME IFS damper & made brackets
- Extended front prop shaft – used IFS front yoke with old Hilux rear CV – the IFS front yoke can twist 40º where the old Hilux only 20º, while the CV knuckle of the old Hilux can swivel a lot more than the IFS CV. Also lengthened by 2â€
- Solid axle knuckle service kit & king pin bearings – overhaul front axle
- Rear leaf spring packs – used old OME springs
- Rear shocks – used old OME shocks
- Rear cross member to mount shocks inwards – made them
- Rear extended shackles – made them
- Rear handbrake lever extensions – made them
- Exhaust modification
- Cutting & grinding discs, welding rods, primer, chassis satin black paint, hole saw
Once everything was in my hands it was time to take the plunge and remove all the IFS brackets with a cutting torch, hint – wear proper protective clothing! I still have scars! Great care was taken not to nick the frame and weaken it; this was followed by grinding everything smooth. The engine mounts were boxed again with some 6mm plate.
Spacers were made and welded to the front of the chassis to space the front hangers down, this is essential to ensure enough bump stop clearance as the IFS chassis is much flatter than the solid axle chassis. Then it was time to cut the old front spring hangers from a piece of chassis and make them look new again, I could have made new ones from scratch…
The spring mounts were held the exact distance apart by tack welding a tube between them and then positioning the assembly on the front of the chassis and tack it in position.
Next the chassis jigs were positioned in the centre of the body mount as shown and marked for drilling the holes for the shackle tubes. We spent an entire Saturday morning measuring and re-measuring for correct placement. This was essential as the vehicle is a daily driver and the caster angle and shackle angle had to be perfect to ensure drivability and safety. The holes were drilled with a hole saw and the chassis tubes measured and tack welded in place. Now the OME springs could be hung and the shackle angle checked before final welding. Everything looked OK and the final welds were burned in. The gussets for the front hangers were made and welded in.
I decided on the OME springs for three reasons: ride quality, flex & durability. No other spring, in my humble opinion, can come close to the OME for pure strength and a comfy ride. They can flex like no tomorrow and still retain their camber for many years. Other springs on the market are much cheaper, but the results explain why.
I used the bare shell of the front axle to mock up and test everything as it was very light compared to the fully assembled front axle. I used the old u-bolts to fit the bare axle to the springs and jacked the front up on its own weight to check bump stop clearance, which was OK.
Next the axle was fully rebuilt; new kingpin bearings, seals etc. were fitted. The mount for the torque rod was cut off as the rod will not be used with crossover steering. This also helps with articulation, as there is no more binding which restricts travel. The spring perches were heated up to a dull red and straightened with a hammer & punch to be perfectly level. Gussets were made and welded in to strengthen the perches. This is a very important step, as the perches are all bowed, which leads to the leaf springs being bent when tightened down with the u-bolts, placing unnecessary strain on the springs. The Marlin Crawler steering arms were fitted – these are works of art! – And the new vented discs and IFS callipers were fitted. I decided to import these arms as I didn’t want to weld some arms together and compromise on safety. I was blessed as the axle was in excellent condition – it came from a 1988 Hilux! – seemed as if it was never used off-road as the ring & pinion, birfields and free wheel hubs were brand new! I filled the knuckles and wheel bearings with some new grease and she was good as new. A push lock fitting was fitted to the breather hole, and the pipe routed high up in the engine bay.
I had to change the final drive ratios as well, as the diesel Hiluxes had a 4.56 ratio and the petrol ones 4.88 ratio, which suited me, as the 2.8 diesel is not exactly very fast and the 4.88 would restore some power, although not enough to run 33 inch tyres though! I managed to swap the 4.56 rear centre portion for a rebuilt 4.88 unit at a wrecking yard for free! They needed the 4.56 centre portion as these are quite scarce and had many 4.88 units as all the older petrol Hiluxes had these ratios fitted. I moved the rear auto locker – 4 years old – to the front axle and fitted a new unit to the rear, as the rear axle works most of the time.
Now the pitman arm was fitted and the heavy duty tie rod and draglink lengths were measured. I had an engineering shop machine them to length and tap them left and right hand thread. I could have done this, but it was much easier to do on the lathe as the thread had to be 70mm deep. They also machined some flats on the rods to help fit a 30mm spanner. The rods were fitted to the steering arms with Land Cruiser tie rod ends, these have a 23mm thread where the Hilux units are 21mm, and the tapers are the same. All this ensured a bullet-proof steering system.
The bump stops were modified and welded to the new u-bolt plates I made and the u-bolts were fitted and torqued to 125Nm. The left side u-bolts are square at the bottom and the right side is round. The u-bolt next to the pumpkin has to be shaped and is longer than the others.
Next the wheel spacers and extended brake lines were fitted and the 31†BF Muds could be slapped on. At this stage 31s will have to do, as the 2.8D will not power the 33†donuts I would like to fit!
I mocked up the flex using a workshop crane and checked the steering clearance and bump stop gap as well as measured for shock placement. Everything looked great and the flex was amazing. Don’t be fooled though, real world flex is totally different and this became evident later when I flexed my baby through a serious ditch.
Shock mounts were made from scratch and holes cut through the inner fenders to stick them through. Once the correct measurements were taken, they were welded on and they look great!
Next the prop shaft was modified as mentioned above and fitted.
Now attention could be turned to the rear suspension and as the front was ± 70mm higher than the rear, I had a hard time deciding what to do. The correct thing to do was to get new spring packs with 5†lift (OME 50mm + new 70mm), but the budget was stretched already and the old OME springs were still fine. The other reason was that the flatter OME springs flex much better than springs with a heavy arch. I decided to fit 2 overload leafs, cut to the length of the spring perch, under the springs for a 25mm lift and the rest was made up with longer shackles. Not the ideal setup, but fitting a 70mm block under the leaf springs was a no-no as the axle wrap was already a problem with the long springs. (IFS Hilux rear springs are 200mm longer than the old Hilux springs). I could have cut of the front spring hanger and spaced it down, but this would hang too low down and be snagged by every rock in sight.
To retain the handbrake, the levers on the back of the drums had to be extended as well as the bracket on the diff. The handbrake cable was moved down and tied to the fuel tank guard with the original clip.
To mount the shocks inward at the rear, I had to make a new cross member. I used heavy wall square tubing and used the pins of the old spring plates to attach the top of the shock. The bottom mounts were made and welded to the top of the diff as close to the spring perch as possible. The axle was fitted with only the main leafs from each spring pack, to allow full compression, this way I could see exactly where the cross member had to be mounted. This is essential as the axle moves around an arc and not straight up and down.
Next I decided to re-paint the shocks with the OME yellow and it made the world of difference. Shocks were mounted front & rear and all bolts & nuts were checked for tightness.
Then on to some real world testing, I drove through quite a ditch and proceeded to rest the full weight of the vehicle on the draglink on the right side, not to mention stuffing the tyres into the back of the fender well. This is where I was glad to have over killed on the steering, as the draglink was still fine!
Back to the workshop where the draglink was removed and after careful measurement a - z – was bent into the left side of the link. I must not let it sound too easy as we actually heated the link till it was red hot and still had to use a length of pipe to get it to bend! This solved the problem completely and the draglink no longer hit the chassis, nor the sump. The back of the fender was customized with a BFH (big friggin hammer) to clear the tyres. At a later stage when I fit 33s, I’ll cut out the foot wells and weld some new plate in for clearance. I could have mounted the axle forward 1â€, but then the steering would not have been as easy to fit; the steering box would need to be moved forward.
The IFS exhaust is routed under the front prop shaft and has to be modified, had it routed to go just underneath the gearbox, just behind the bell housing and out to the back. At the rear it had to be snaked around the left shock. All came out very good.
Lastly the OME steering damper was fitted with a custom bracket and small u-bolts.
Feedback after a month of driving and wheeling:
- I was ready for the notorious hard ride of the solid axle, but in all honesty, the ride comfort is equal to, if not better than the IFS! No joke! The body roll is a lot more, but this is still a controlled roll where the body will roll when negotiating a corner at speed, but doesn’t feel wallowy at all. This can be remedied by fitting an anti-roll bar with quick disconnects for wheeling. I’m already used to the body roll, in any case it is fun to scare little old ladies when you go around a corner and it looks as if you are going to fall on them! Only joking!
- There is a bit of feedback through the steering wheel when on uneven tar roads, but this is due to the wheel spacers which alters the turning angle of the knuckles.
- The steering effort is the same as with the IFS steering, which is an added bonus.
- Braking is powerful as with the IFS.
- Off-road the suspension is just awesome. Actually you don’t appreciate it until you let somebody else drive and you can see the suspension at work. It is very hard to lift a tyre and most hills and rocks can just be crawled at idle speed.
- The big problem now is clearance, under the diffs, fuel tank etc. Previously with the IFS, the vehicle would run out of traction long before you get hung up on an obstacle. Now, it just wants to go forward and anything in the way will just be, well, in the way. Rock rash is a very real concern!
- As I said before, I should have done this a long time ago and with the nice smooth ride, what a pleasure!
UPDATE:
- The Rubicon shocks fitted to the front turned out to be too softly valved for the 4Runner. I bought some 14†Fox Racing shocks, re-valved them and fitted remote reservoirs – awesome! Have been running these for the past two years now.
- Had some issues with the tie rod hitting the sump on full compression after airborne antics – ended up re-drilling the front spring perches and moving the axle forward 1 inch. This worked out very well and gave some extra clearance for fitting 33’s.
- Massaged the inner fender well with a 14 lbs hammer to clear 33’s.
- Recently fitted 1KZTE engine with original computer etc. See other posting for details.